31.12.22

Xmas pyjama time!

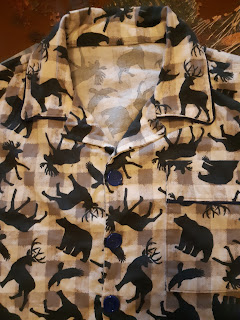
My favourite old tradition! Matching pyjamas for xmas eve. If I'm being honest mine weren't finished till boxing day, but I've been living in them since! 

Matching the pattern on the kid's pyjamas turned out trickier than expected... it's almost as if the grey gingham background and black animal silhouettes were printed separately and the pattern repeats are different lengths! Yikes. I managed to find a "close enough" piece but it's not absolutely perfect. 

Flannel pyjama pocket with piping

Much happier with my own pocket. 

Pyjama pocket with piping


This is a really nice quality flannelette too; last year's didn't have the same body, but this has some heft as well as fluff. If I'm smart, I'll head back to Len's Mill this week to see if they have boxing day deals, and get back to the tradition of getting these finished in July!
Grey check pyjamas with black animal overprint

Woman with red glasses and hair in a messy bun in grey pyjamas


2.12.22

It's party apron time!

In the 1960s, my mother (the snappiest of dressers) sewed herself a holiday party apron, in white organdy with applique red and green xmas bells and ornaments (which doubled as pockets) trimmed with metallic rick rack. I just pulled myself out of an internet rabbit hole trying to find pictures. I know I have the original somewhere! But its condition is a bit delicate. 
Anyway I decided to sew one for myself, with matching oven mitts, after being inspired by the FW 2022 Batsheva + Laura Ashley collection. It's hard to see in the pictures, but the polka dots are a soft metallic silver, and the piping is quite blingy!


7.11.22

New skirt!

Started this months ago and got distracted by other things... nothing fancy but I can see me wearing this a lot!


30.10.22

One day to go

Aaaahhhhh!!

Home stretch. Getting close. Except the cat keeps stealing stuff like buttons and thread.

But I am pleased to say the shoes are done. Thought they would be easier, starting with the Chinatown cotton Mary Jane slippers I wore throughout highschool, but you can't get them anymore, only slip-ons. I remembered this as soon as I saw them--last time I thought I'd buy those slippers they were nowhere to be found. I asked the shopkeeper who confirmed it's been years since they were available. 

So, slipper conversion as well as applique. 


At least handsewing is portable--took this with me to Sunday service!


28.10.22

Still plugging away as the deadline looms

So this is basically my only plan for the weekend—sewing, sewing, and more sewing.

Here's what I've done so far:

  • Base dress (done)
  • Bloomers (done)
  • Ribbon tie with insignia (done)
  • Wig (purchased)
  • Shoes (purchased)

Still to do:

  • Assemble apron with gold trim (augh)
  • Sleeves (more gold trim augh)
  • Collar/Dickie (had hoped to start with a thrift store shirt but didn't find a suitable one)
  • Gold trim on shoes (augh)
  • Bowtie (do I have one somewhere?)
  • Bunny tail (purchase)
  • Style wig

What am I forgetting...

Anyway this gold fabric is awful. Slippery, stretchy, even when I stabilize it with fusible interfacing it won't stay fused. I tried using a hotter iron, up to the point of starting to get a scorched plastic smell, but even though it seems attached, it comes loose after a few minutes if you try to cut or sew. Grr. I'm going to experiment on a scrap with spray starch, but I see a lot of basting in my future. 

Looks nice though!


22.10.22

When you can't find what you want, make what you want

A big part of the Saber Astolfo costume is the gold trim. I initially imagined using braid or similar, but couldn't find anything that was just exactly right. And trying to work out how much I'd need to follow the zig-zaggy crenellated pattern was requiring too much thought. Then I saw this fabric: 

Liquid gold! I got some fusible interfacing to make it less liquid where needed (although I'm afraid I'll just melt it) so I can cut out the various trims and decorations. Meanwhile I started with the sleeve trims:

Red ribbon edged with gold. The one on the right shows the bits before I put them together. 
And the final product:


17.10.22

C'est l'Hallowe'en!

Late decision but I'm making a Fate Grand Order Saber Astolfo (3rd Ascension)!

Started by sketching out some pieces directly on the fabric in chalk: circle skirt, simple v-neck bodice, puffy sleeves. 


Here's where we're at after a couple of try-ons and couple of tweaks:


Glad this part was fairly easy as the trim will  be something else!

27.8.22

Holiday pyjama time again

Is anyone else feeling behind in their xmas shopping? I have two things ordered and on the way, and that's basically it. Today I bought fabric for pyjamas though! Getting more sedate as my kid gets more grown up. I was thinking piping and buttons in the taupey grey colour that runs through both fabrics, but maybe navy blue?


22.7.22

Getting closer

More work on the straw hat bike helmet! 

I suddenly realized that my arbitrary deadline is drawing near. I had the idea that it would be part of my Shakespeare in the Park picnic outfit, and our tickets are for next week! This is why I need arbitrary deadlines, I guess.

Somehow I never took a photo of the shiny straw capeline I bought from Petersham but it looked exactly like their photo on Etsy:

Shiny Straw Capeline from Petersham’s

I’m sure they won’t mind me borrowing it, since I’m linking back to them (and you should buy one!)

Yesterday, I finally got around to shaping. Lots of steam from my kettle (I steamed the outside, then the inside, then just took the lid off the kettle and plopped the capeline on top), and I got this:

Partially shaped Capeline

It took a lot of work to make it fit around the helmet! I used pushpins (carefully pushed between the strands of straw, not through them) to hold in in place while shaping.

Next, I moved it all to the ironing board, to flatten out the brim, and get a crisp edge where brim meets crown, and heavily steamed the top and shaped it by hand to look more “hat-like” instead of just wonky. I weighted it with what was handy while it was cooling and drying:

Shaped!

Next will be applying a band and stitching in the lining. I’m a bit worried about the pull of the elastic causing problems with the straw. Maybe it needs a permanent hat stand when not in use? Hmmm...

15.6.22

Getting excited!

I have been dreaming of this project for a while and I am finally making it happen!

Years ago, I bought a Yakkay helmet from my local bike shop for a fantastic deal (70% off). It comes with a replaceable cloth cover, and looks like a cool hat rather than a dorky helmet. This thing became part of my identity, and I wore it for +/- 15 years. 


You're supposed to replace a helmet every three years. Oops.

Anyway it was time to replace it, and obviously I wanted another Yakkay. 

Trying to find a place to buy one (I'm in Canada, they're from Denmark) I found this gorgeous straw cover and fell in love! But €119 + shipping + customs/duties + the actual helmet is far out of my price range. 

So I didn't get it. But I didn't give up.

I got a helmet with a different cover (the Tokyo black rain cover) from Green Street, a bike shop in Peterborough (not exactly local, but as local as I could get).


 Next was searching for millinery suppliers that had what I needed at a price I could handle with reasonable shipping costs. Found what I was looking for at the Petersham's Etsy store. I think it was $14 for the capeline and another $14 for the shipping. 

Then I had to figure out the engineering required to keep the cover on the helmet. The cover has a sturdy band attached to wide elastic and a mesh liner. I got a yard of mesh for $10 at a local fabric store, and had wide black elastic and nylon webbing in my stash from previous projects (snowpants and a Hallowe'en costume).

I drafted a pattern from the existing covers, which was quite tricky, because what keeps it all together is tension. Fit has to be perfect, and the helmet is hard and slippery, so not like a dressform where you can drape and pin. I started with wide seam allowance and adjusted down as necessary, and it was necessary multiple times, because it seemed pretty good until I added the band, and then it seemed pretty good until I added the elastic. 

Anyway I am finally happy with the base! It stays on! 

Next step: shaping the straw capeline with steam, and figure out how to attach to the liner...


So far I've spent about $45 on the cover - not exactly cheap, but a lot less than €119!

22.1.22

I'm back!

Wow, this blog has been abandoned for a while! Whoops. I had an issue with a creepy creep who used it to find my home address and send me threats on Yelp. No really. People are the worst.

Anyway creeps better look out, because I now have superpowers including time travel! Not really. But my Hallowe'en costume for Five from Umbrella Academy might scare someone into thinking that? Maybe? No?


So I'll confess a fair amount of this is prefab - the socks, the shorts, the shirt, the tie. The jacket is from the Sally Ann, with bias tape hand sewn around the edges, and I embroidered a crest, which you can't see in that photo at all! Here it is:


And obviously the vest is a hand knit, because I always forget how much I hate knitting argyle:


So hello again! Maybe I'll start posting here more regularly if I actually get some projects done... or started... I have a couple of filmcrafty projects in mind, but have been too busy with pandemic baking to get much done. We shall see!

Meantime, I updated the links to all of the free knitting patterns I posted previously, if anyone still wants them!