Showing posts with label knitting. Show all posts

28.11.24

An autumn sewing

Once again, it’s been a while!

So far since my last post, I’ve made another Argil tank top and finally finished my Gr8 Gingham Raglan. Really happy with both (although I barely finished the Argil before the weather changed).

Gr8 Gingham 

Another Argil 

Next up is obviously pyjamas!

Winter flannelette... so far all I’ve done is prewash 

And after that, something very new for me: cycling shorts! 

Fabric and sewing pattern for cycling shorts 

I don’t do a lot of sewing with knits, but I’m doing a 3-day, 300km fundraising ride next summer, so need more kit! Fabric and pattern are from Discovery, chamois on order from Aerotech. Wish me luck!

21.5.24

Me Made May week 3

Another week over!

Weather was up and down, as was my mood.

Mother’s Day was this week, so feeling blecch. Even though I made sure it was a lovely day—breakfast in bed, group bike ride—I want someone else to do the legwork for once. Waah waah.

Polka dot nighty 
Sundress with yellow roses

This was the year that I finally bought shoes a size large for the sake of handknit socks, just in time for it to be too warm (mostly) for handknit socks. 

Socks 

The uppy-downy weather made it good for a wardrobe staple for me: the sleeveless shirt, perfect for layering for changing temps. Also another pair of handknit socks, and the jeans that are my bellwether of fitness (bit on the snug side, but we’re getting there.

Sleeveless polka dot shirt, straight leg jeans, wool socks

This is my Cary Grant in To Catch a Thief cosplay. Linen sweater, linen pants. Still working on my Grace Kelly. 

Striped linen sweater, grey linen trousers 

Getting even warmer, a cotton knit top (with a really interesting construction) and cotton twill skirt (just tailored enough to make the very casual top feel work worthy).

Cotton striped knit top, cotton twill skirt

And finally, long weekend, more sleeping in.

Pyjamas 

11.5.24

Me Made May week 2

It's Me Made May week 2! Summer dress season! 

Copying the summer dress manifesto I posted on socials:

You might see someone wearing a summer dress and think ๐Ÿ˜ and feel compelled to express your feelings! Here are 2 tips on how to do that in a way that will be appreciated:

1. Wear a summer dress ๐Ÿ’ƒ

People wearing cute summer dresses almost always appreciate seeing other cute summer dresses. Be part of summer dress season by wearing one yourself!

Not a dress person? Try other grownup clothes, anything made of woven fabric with button closures is a good place to start.

2. Compliment the dress! 

Comments like "OMG that dress is adorbs" or "that colour is amazing on you" are ๐Ÿ‘ 

One caveat: the *only* people allowed to comment on summer dresses are people who are themselves wearing summer dresses.

So: wear a summer dress, see a dress, say "I love your dress!" And maybe they'll say "no I love YOUR dress!!" This is the ideal summer dress season interaction.

V-back Fit-and-flare in polka dot cotton poplin 

Gingham ruched and ruffled with handknit cardigan 

Black and white V-neck 

Ruched V-neck in black knit 

Vintage party dress with handknit cardigan 


6.5.24

Me Made May

It’s that time of the year again!

I have been making an effort to wear at least one me-made thing every day, whether it’s handsewn or handknit. (I eat something me-made every day as well but that doesn't seem like much of an accomplishment.)

The intent is to take regular outfit of the day pics to share once a week. Helps that the summer weather just arrived as I was getting bored with sweaters. Here’s what I've got so far:

Floral embroidered gingham shirt with removable pussybow, denim wrap skirt 

Felted banya hat 

Fit-and-flare shirtdress with bell sleeves in organza with silver polka dots 

V-neck ruched dress in floral/dotted jersey 

Cotton poplin wrap dress with topstitched floral trim and tie

Muslin shirtdress with waist tie and piping 

They’re not all exactly the same but there are definitely some recurring themes here... shirts and shirtdresses, knee-length skirts, wraps and ties and bows, dots and florals, black and white and red. I’m fine with that though, clearly I know what I like to wear!

Part of the purpose of this exercise is not just knowing what I like, but actually wearing it—not second-guessing whether it’s age-appropriate, or “too costumey,” or whatever other element of self-doubt and insecurity tries to sneak in and steal joy. Just be unabashedly whatever one wants to be, wearing whatever one wants to wear. So far so good?

10.3.24

Two for me

Before getting too stuck into kid stuff, I decided to take a day to make things for me!

First a hoodie for a cover-up after a run or tennis, and then I converted some regular socks into pompom socks!

Here are the socks:

Foot wearing finished pompom sock
The socks!

I had a bunch of mid-calf athletic socks that I bought last year. I hate mid-calf socks. I only bought them because I was buying a pair of ski boots from someone off kijiji (which is why it never snowed last winter) and forgot to bring socks for trying them on. So no great loss to me if I ended up destroying a pair of socks I didn’t wear anyway. And I happened to have a small length of red pompom trim, about 8” (6 pompoms).

So pompom socks! A favourite from childhood. And practical, because they don’t get eaten by your shoe.

First thing I did was to chop the socks off. I left about an inch of the ribbing that started at the calf, folded over a 1/2” hem, and sewed down using a triple zigzag for stretch. I started sewing about 1/2” to the left of centre back, so when I was reaching the place where I started, I added a length of pompom trim (about 1” long, or 1 pompom) and continued my triple zigzag to attach.

Sock trimmed, hemmed, and with pompom attached

Hem and pompom as seen from the inside

Then, using an upholstery needle and some red cotton yarn from an unfinished knitting project (whoops), I went around the edge of the sock in a deep, somewhat loose blanket stitch. When that was done, I slipped 2.25mm dpns through the loops of handsewing. I picked up and knit these as stitches, working one row of stockinette and two rows of k1p1 rib, before doing a stretchy bind off (yo before each stitch, and then slip the yo over the stitch and off the needle, along with the previous stitch). For this sock I ended up with 52 sts, but I think 48 would have been better.

Here’s a finished sock!

The finished project!

The hoodie:

Hard to see the front pocket, but it’s big! 

I wanted a cocoon-ish kinda feel, so I made it extra long, with a ginormous front pocket and a sort of funnel-neck hood, very shaped.

Started with my standard pyjama top pattern, except added a few inches in width and length, to both the bodice and the sleeves. I added an extra swoop of length to the back, for when I’m wearing it over running tights and want to cover up the rear view.

Longer in the back for coverage

For both the hood and the front pocket, I started by copying from a hoodie of my kid’s, and then basically eyeballing some modifications. For the pocket, I just made it a little bigger, in case I want to put some tennis balls in there. For the hood itself, I cut on the fold instead of having a centre seam, and then fashioned a gusset, so it’s more head-shaped.

Hood down

Hood up

Adding a truly crappy pic of how I altered the hood—black outline is roughly what I traced from the kid’s hoodie, red outline is how I altered it.

Terrible sketch, but you get the idea

I still need to add some drawstrings—I mean they’re not strictly necessary, but I want to. I also made a pair of booty shorts from the scraps, but I’m not posing in those!

Editing to add: I went to Brother WorldSew yesterday to buy some stuff for cosplay and grabbed a few of these cotton bootlaces—thrilled at what a perfect colour match they are! And a perfect length and weight as well.

Drawstrings!


3.3.24

Cosplay season is back!

About to swing into high gear with cosplay stuff! One for my kid, one for my niece. I’ll just be the Warner Sister Dot again. 

So I was determined to get at least a couple of my own projects out of the way first... 

A(nother) striped sweater, Montmartre jumper by Fabel Knitwear:


Bought the yarn over a year ago! It was time!

Replaced the lining in a velvet jacket:

Check the pattern matching on this pocket!


And altering/remaking a skirt from my cousin Pamela.


But then I accidentally bought more fabric, whoops... couldn’t resist Japanese panels in silk and wool at the Textile Museum sale:


But it’s my difficult time of year, and I did my taxes, so I deserve a treat?

30.12.23

Year-end round-up

Just a December catch-up since I haven't been posting much:

Finally finished the dreaded stripey linen sweater! Decades-old yarn that was thrifted, decoloured, dyed, tangled, unravelled, knit, frogged, reknit:

Striped linen sweater done at last!

And of course xmas pyjamas (only got the kid's done, mine are still on the machine):

Pattern matching too ditsy to notice 

And currently working on a sweater I fell in love with about a year ago, and got the yarn for last spring:

Starting the Montmartre sweater 

Plus the usual xmas baking:

Pecan coffee cake 

Happy new year, let's hope it's a good one 

29.12.23

I’m in love!

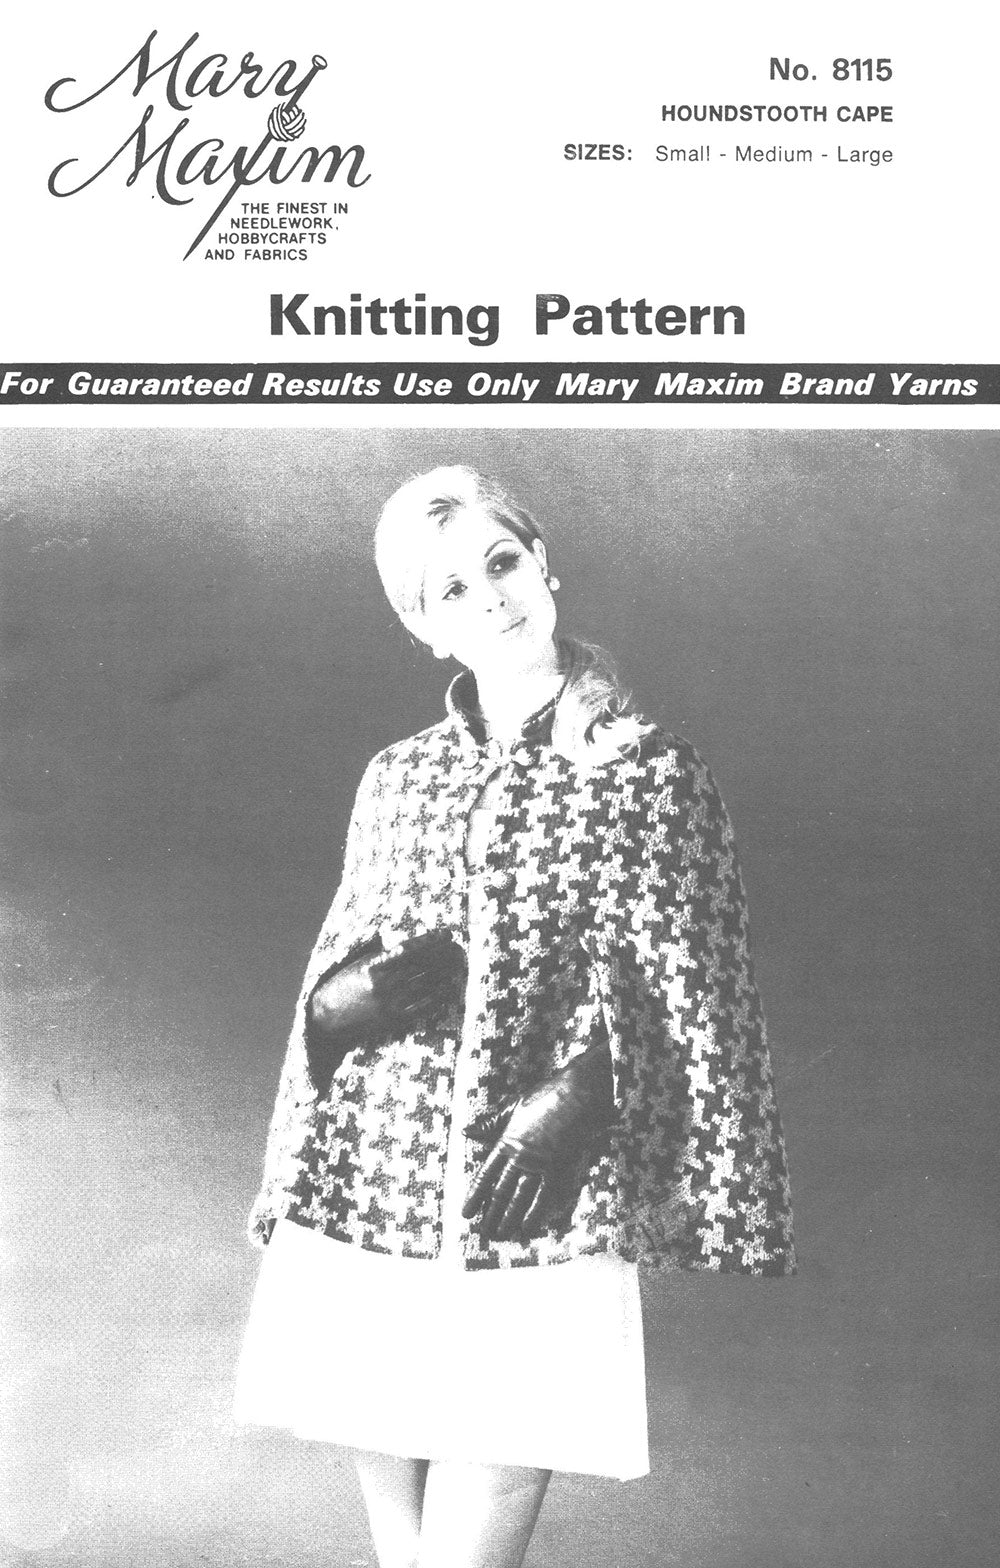
How did I not know that Mary Maxim has a ton of vintage knitting patterns currently on sale for $2.99! 

I can’t resist the capes. Especially when I’ve been on a houndstooth kick lately, after falling down an Alexander McQueen rabbit hole and landing in the Horn of Plenty. Who could resist this houndstooth cape:


I already have too many things on the needles but this is definitely going to happen soon...

Funny enough, before I got on my A McQ kick, I had stumbled upon a Reddit post about a cape pattern... which someone made in houndstooth... and I completely forgot until just now, when I saved photos of this vintage pattern (Simplicity 9669) to my computer for reference, and found I had already saved the exact same pic last January ago...

Simplicity 9669 cape pattern with diagram

I mean I guess it’s the universe telling me I will never outgrow the desire for a houndstooth cape, so I need to make one by hook or by crook...

3.11.23

Knitting poppies for peace

Did you know Remembrance Day used to be called Armistice Day? Because it was to honour the end of war, and celebrate peace? Somehow that got lost in the shuffle…

Anyway, I decided to knit a white poppy for peace, a longstanding tradition back to 1936. 

White Poppy for Peace

And here’s a free pattern for anyone who wants it and believes in peace!

17.6.23

Finished!

Finished the Argil tank! Very happy with it! Great pattern all around—well-written, interesting construction, a nice balance of mindless and interesting, and easy to see progress by the stripes. 100% would make again!


I really like the yarn as well, Mandarin Petit from Sadnes Garn. 

My clematis is a hit in the backyard too!

24.5.23

Subway knitting returns

Back to the office means back to knitting in public! At least on rainy days when I'm not keen to ride my bicycle. 

Currently on the needles: the Argil top in cotton, I can see getting a lot of wear out of this over the summer!

All my commuter gear 


18.3.23

The Warner Sister Dot

So a couple of years ago I started a Hallowe'en costume that I never entirely finished! I was taking notes as I improvised and intended to publish the Toon Hands pattern eventually, but who knows where those notes ended up.


Anyway, I was thisclose to finishing the head - just had one ear to go - but then it was Hallowe'en and I went out in plain clothes and abandoned it.

Well, while working on the Spiritron Dress with the kid, I asked, what should I dress as for ComiCon? Generic mum in jeans and sweater? Or the Warner Sister Dot? They voted Dot, so I finished my lid, hemmed an old pink skirt, and here we go. I might make a bigger flower; it was all very last minute. But overall pleased with the finished product, and three people asked to take my photo!


11.2.23

Banya hat

I thought I posted about this before but I guess I’m mistaken!

Last year I started going to a Russian sauna/bath house, aka banya, with a friend of mine. One of the traditions of banya is to wear a wool hat to keep your head from getting too hot. With my friend’s birthday coming up, I decided to knit and felt a hat!


It did not work!


I mean it kinda worked, but not really. Shape right, size wrong. I had modified a pattern, and also substituted the yarn as I couldn't find the one they recommended, and after all of that it turned out waaay too big.

So I decided to start again (this is why I bought extra yarn!) and I think I’ve got it!

I completely altered literally everything from the original pattern I started with, so here it is, my banya hat pattern:

Banya Hat instructions

Using 2 balls of Istex Alafos Lopi and 9 mm circular needle

Cast on 84 sts. Join to work in round.

Work in stockinette (knit every stitch). Place markers every 21 sts.

Brim shaping: 

Row 4: *Knit to marker, sl m, k1, k2tog* repeat 4 times across row (80 sts on needle)

Row 8: *Knit to 2 sts before marker, ssk, sl m* repeat 4 times across row (76 sts on needle)

Continue working in stockinette.

Crown shaping:

Row 38: *Knit to 2 sts before marker, ssk, sl m, k1, k2tog* repeat 4 times across row 

Continue working in stockinette repeating row 38 until you have 4 sts on needle.

Next row: k1, k2tog, k1. Slide sts to other end of needle. 

Work these 3 sts as i-cord (sliding to other end of circ or dpn to work in same direction, rather than in the round) until the i-cord is 6” long. Fold over, break yarn leaving long tail, and graft to top of hat near base of i-cord, closing any gaps at top of hat.

Felt. I find by hand is more successful than by washing machine, even if it is kinda miserable.

I have a double kitchen sink, so what I do is fill one side with hot water (and a squeeze of dish soap) and the other with cold. Keep a kettle and ice cubes on hand to keep the hot hot and the cold cold as necessary.

Wearing rubber gloves, put the hat in the hot water and go at it like a puppy with a chew toy. Agitate, agitate, agitate. Imagine you are Lady MacBeth crying, “Out, damned spot,” as you go postal on your handwashing. Then squeeze it out and plunge it in the cold water. Agitate, squeeze, and return to the hot.

Keep going back and forth like this, adding boiling water (pour it right on the cold hat!) and ice cubes as needed to keep your water temperatures extreme.

Also keep a ruler handy so you can measure your progress. I find it takes about half an hour of back-and-forth to get ’er done. About 10” across the bottom is what you’re aiming for.

Use your hands to shape/sculpt the wet hat until it looks about right. Let air dry for a bit so it retains its shape—I put it over a milk bottle (to keep it upright) on a floor vent (for airflow). Stuff loosely with a hand towel, zip into a mesh lingerie bag, and finish in a hot dryer. Put a dry bath towel in with it to help get the moisture out.