Before getting too stuck into kid stuff, I decided to take a day to make things for me!
First a hoodie for a cover-up after a run or tennis, and then I converted some regular socks into pompom socks!
Here are the socks:
 |
| The socks! |
I had a bunch of mid-calf athletic socks that I bought last year. I hate mid-calf socks. I only bought them because I was buying a pair of ski boots from someone off kijiji (which is why it never snowed last winter) and forgot to bring socks for trying them on. So no great loss to me if I ended up destroying a pair of socks I didn’t wear anyway. And I happened to have a small length of red pompom trim, about 8” (6 pompoms).
So pompom socks! A favourite from childhood. And practical, because they don’t get eaten by your shoe.
First thing I did was to chop the socks off. I left about an inch of the ribbing that started at the calf, folded over a 1/2” hem, and sewed down using a triple zigzag for stretch. I started sewing about 1/2” to the left of centre back, so when I was reaching the place where I started, I added a length of pompom trim (about 1” long, or 1 pompom) and continued my triple zigzag to attach.
 |
| Sock trimmed, hemmed, and with pompom attached |
 |
| Hem and pompom as seen from the inside |
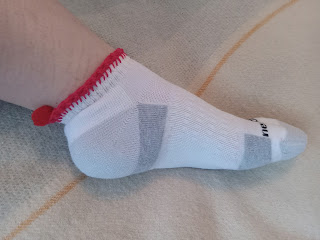
Then, using an upholstery needle and some red cotton yarn from an unfinished knitting project (whoops), I went around the edge of the sock in a deep, somewhat loose blanket stitch. When that was done, I slipped 2.25mm dpns through the loops of handsewing. I picked up and knit these as stitches, working one row of stockinette and two rows of k1p1 rib, before doing a stretchy bind off (yo before each stitch, and then slip the yo over the stitch and off the needle, along with the previous stitch). For this sock I ended up with 52 sts, but I think 48 would have been better.
Here’s a finished sock!
 |
| The finished project! |
The hoodie:
 |
| Hard to see the front pocket, but it’s big! |
I wanted a cocoon-ish kinda feel, so I made it extra long, with a ginormous front pocket and a sort of funnel-neck hood, very shaped.
Started with my standard pyjama top pattern, except added a few inches in width and length, to both the bodice and the sleeves. I added an extra swoop of length to the back, for when I’m wearing it over running tights and want to cover up the rear view.
 |
| Longer in the back for coverage |
For both the hood and the front pocket, I started by copying from a hoodie of my kid’s, and then basically eyeballing some modifications. For the pocket, I just made it a little bigger, in case I want to put some tennis balls in there. For the hood itself, I cut on the fold instead of having a centre seam, and then fashioned a gusset, so it’s more head-shaped.
 |
| Hood down |
 |
| Hood up |
Adding a truly crappy pic of how I altered the hood—black outline is roughly what I traced from the kid’s hoodie, red outline is how I altered it.
 |
| Terrible sketch, but you get the idea |
I still need to add some drawstrings—I mean they’re not strictly necessary, but I want to. I also made a pair of booty shorts from the scraps, but I’m not posing in those!
Editing to add: I went to Brother WorldSew yesterday to buy some stuff for cosplay and grabbed a few of these cotton bootlaces—thrilled at what a perfect colour match they are! And a perfect length and weight as well.
 |
| Drawstrings! |


No comments:
Post a Comment